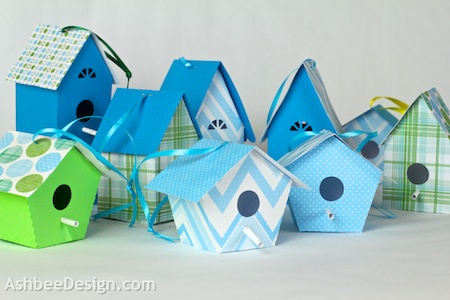
I have designed patterns for an entire village of embellished birdhouses. Each one is unique and sports decorative cut outs for added interest. The files are sized to work together. The set is growing but currently includes the following files:
- Heart Bird House
- Double Decker Bird House
- Rounded Bottom Bird house
- Scalloped Edge Birdhouse
The same techniques were used to assemble all of these structures. I have assembled one tutorial but you can follow these steps for any of the designs.
Display a birdhouse village hanging from a gnarled piece of driftwood.
Note:
I am a new Silhouette Contributing Artist. Both my Silhouette files and this website are the beginning. Send along any suggestions, problems, ideas or photos as we learn to create together. I'd love to hear from you! Marji RoyeMail: ashbeedesignemail@gmail.com
Tutorial assembled using Silhouette Software Release 2.7.18. This tutorial assumes you already know how to use the Silhouette and Silhouette software.
Supplies Needed:
- Template from Silhouette On-Line Store (Link to template added herexxxx)
- Heart Bird House here.
- Double Decker Bird House here.
- Rounded Bottom Bird house here.
- Scalloped Edge Birdhouse here.
- Glue dots or other fast drying paper glue
- Silhouette Cameo
- 1 sheet of patterned paper - for each bird house
- 1 sheet of contrasting paper - for each bird house
- 12" 1/8"-1/4" wide ribbon in complementary color
- 1 tooth pick
Steps for completing the Bird House Project:
1. Download the cutting file for your Silhouette Cutting machine from the Silhouette Online Store at the links noted above. Each file contains the three parts for a specific birdhouse including the basic structure, a roof pattern and a perch pattern.
2. Cut the file.
I like to cut the structure and the roof from contrasting papers. I have used combinations of prints and solids or all solids. The easiest thing to do is print the file twice, on two different papers and then mix and match the roof and structure. Here is a sample of the scallop edge birdhouse done that way.
Before you cut, consider how you will display the birdhouses. If they are going to hang, then you will want to insert a ribbon and the slots are located on the roof. If you are not going to hang them, then you may want to ungroup the file and remove the two roof slots.
Here are all the parts for one birdhouse cut and ready for assembly.
3. Fold the house
- Note: Each cut file has dotted lines. These are fold lines.
- Fold along all fold lines. The folds all go in toward the inside of the birdhouse.
4. Glue tabs in place.
- I like to use Glue Dots although other glue types are appropriate.
- I start by gluing the edges that attach to the birdhouse front in place. I do the back last. This is because you can reach the back more easily through the entry hole for pressing together.
- I apply 2-3 glue dots per tab....
- And pressed them in place carefully lining up edges and keeping things square.
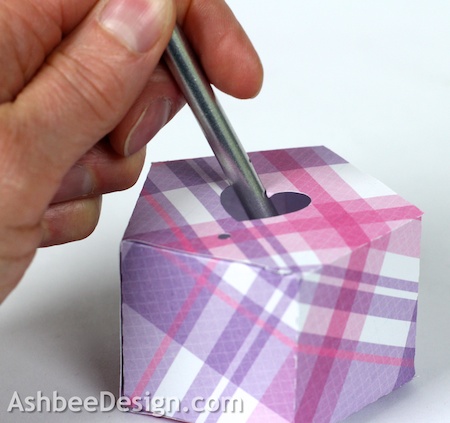
- Once the front and roof are in place, apply glue dots to the remaining tabs for the back side. Carefully position the back and use a skinny tool inserted in the entry hole to press them into place.
5. Add the ribbon and attached the roof.
- If your bird house is going to hang from a branch, now is the time to thread a ribbon in the slots on the roof.
- Then apply glue dots to the roof and carefully position it in place. It is designed to have an over-hang in both the front and back.
- Take the small rectangle and wrap it tightly around a toothpick. Glue the outside edge. (But not the inside edge or it won't slide off!)
- Insert the tooth pick with the perch into the hole beneath the entry. It will be tight and if you carefully twist the perch as you insert it, the hole will widen and you can slide it it place. If you do this carefully, the hole will stay tight and the perch will be secure.
- Slowly, pull out the tooth pick, leaving the perch in place.
Nothing like a plaid birdhouse to brighten your home!
Go and make some more with different papers.......
Download some other patterns and make some different shapes......
And soon you'll have a neighborhood!
I brought a bunch with me to visit my grandson. We used them on his Easter Egg tree!
**********
© 2013 Marji Roy, Ashbee Design


.jpg)


So cute, but how do you make them on a stick?
ReplyDeleteJust cut an X in the base and pushed the dowel up through to the roof. It rests beautifully there.
DeleteIs it also for the silhouette portrait?
ReplyDeleteThe Heart, Round bottomed and scalloped will all fit on the Portrait although you will need to rearrange the pieces. The Double decker is too large.
DeleteHi Marji Roy
ReplyDeleteI love your designs and have been fascinated by your husband's kinetic sculptures which I found whilst looking at some of your designs for the Silhouette Cameo. I purchased my Cameo in September and am really enjoying experimenting.
I am going to try using this Bird House design to create a gift box for some seed packets to give to my Mum as part of her gift this Mother's Day (March 30th). She will love it I'm sure. Its like 2 gifts in one :)
I will leave the lower flap unglued but put on double sided tape so she can remove the cover strip and push it inside to glue it in place.
If it works I intend cutting it out in Funky Foam too so it'll be weatherproof(ish)
Thanks for the design and the inspiration.
Love the idea of the seed packet containers. Send pictures so I can share! I am glad you enjoyed David's Wood That Works site as well. We lead an interesting and creative life here for sure. Thanks, Marji
DeleteThese are so very cute. Just bought two of them :-)
ReplyDeleteI am going to make some to decorate my studio - I will make some tiny birds to go with them.
Send pictures for me to share! Have fun crafting.
Deletebeautiful ,,wonderful..
ReplyDelete