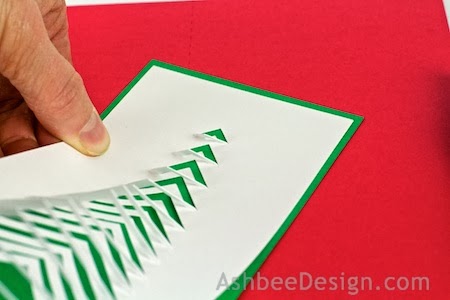
Project Description:
Over the past 30 years I have designed and made by hand many different Christmas Cards. (Click here to see all the many designs.) This Chevron Tree was first designed by me in 2005 (which was before I was blogging and before I owned a Silhouette). I cut 70 of them by hand. I have redesigned this card so that it can be cut using the Silhouette and made the file available at the Silhouette store. It is far faster! The design which features a 3-D folded chevron is sized to fit in a classic business-sized envelop which can be purchased in colors during the holiday season.
Chevron Christmas Tree Card Tutorial:
Tutorial assembled using Silhouette Software Release 2.7.18. This tutorial assumes you already know how to use the Silhouette and Silhouette software. It can be cut on both Cameo and Portrait Silhouette machines.
Supplies Needed:
- Template from Silhouette On-Line Store here .
- Glue - or adhesive tape
- Silhouette Cameo or Portrait
- Card Stock in red, green and white
Steps for completing the Chevron Tree Card:
1. Download the cutting file for your Silhouette Cutting machine from the Silhouette Online Store here. This is how the file is set-up.2. Prepare and cut the file.
- Copy and paste the chevron pattern into a new file and cut from white card stock. If making multiple cards, you can fit this pattern 3 times on each 8.5 x 11" piece of card stock.
- Note: If the file is grouped together, select it by clicking on it, go up to the OBJECT MENU in the Silhouette software, and down to the UNGROUP command. This will allow you to copy individual elements and paste in a new file (FILE MENU to NEW).
- Copy and paste the smaller plain rectangle into a new file and cut from green card stock. If making multiple cards, you can fit this pattern 3 times on each 8.5 x 11" piece of card stock.
- Copy and paste the large rectangle plus the star into a new file and cut from red card stock. Only 1 will fit on an 8.5 x11" sheet.
- Here are the cut parts:
3. Fold the chevron pieces.
- Fold every other chevron down toward the base of the card being careful to fold evenly.
- Apply paper glue or adhesive tape to the back edges of the white piece and glue onto the green rectangle. Place it to have an even border on all sides.
- Glue the red star to the white space above the narrow end of the chevron.
- Fold the red rectangle in half along the dotted fold line.
- Apply paper glue or adhesive tape to the back of the green rectangle and glue onto the front half of the red card. Space it with a little more space at the bottom than the top.
- Add holiday wishes to the inside and send to your friends and family.
- Suggestion: Print the holiday wish on white paper, cut to size and glue to the inside of the card. I always like to add the year to the message as well. People tend to save handmade holiday cards. There are friends that have 30 years of my handcrafted cards!
**********
© 2013 Marji Roy, Ashbee Design
Sharing this post at some of these link parties. They are worth checking out for other ideas.
Motivate Me Monday, Mop It Up Monday, Alderberry Hill, Metamorphis Monday, Tuesday Treasures,Today's Creative Blog, A Bowl Full of Lemons, Not Just a House Wife, The Inspiration Board, Romancing on a Dime, DIY Dreamer, Whatever Goes Wednesday, Transformation Thursday, House of Hepworths, Craftberry Bush, Jennifer Rizzo, One Artsy Mama, Craftionary, Flaunt in Friday, Tater Tots and Jello, Show and Tell Saturday, DIY Showoff, I Gotta Try That, Kathe With an E, The Girl Creative


This is beautiful! I can't imagine cutting one by hand, let alone 70! I'd love to be on your Christmas card list ;)
ReplyDeleteI am so happy I have the Silhouette to do my cutting although it can be slow. Part of the design challenge is keeping it simple!
DeleteAs an art and a math lover, these make me SO happy!! :D
DeleteNo doubt about it. I use geometry ALL the time in my artwork.
DeleteWow it so nice
ReplyDeleteWow! So amazing... Congrats!
ReplyDelete