11.04.2013

Ledge Village Fullerton House Tutorial


Project Description: 
The Ledge Village is series of 3D buildings and accessories that can be combined in a mix and match fashion to build tiny villages on small ledges around your home.  The buildings are thin, with all detail on the front so they fit on small trim ledges. This tutorial is for another house style, the Fullerton House.

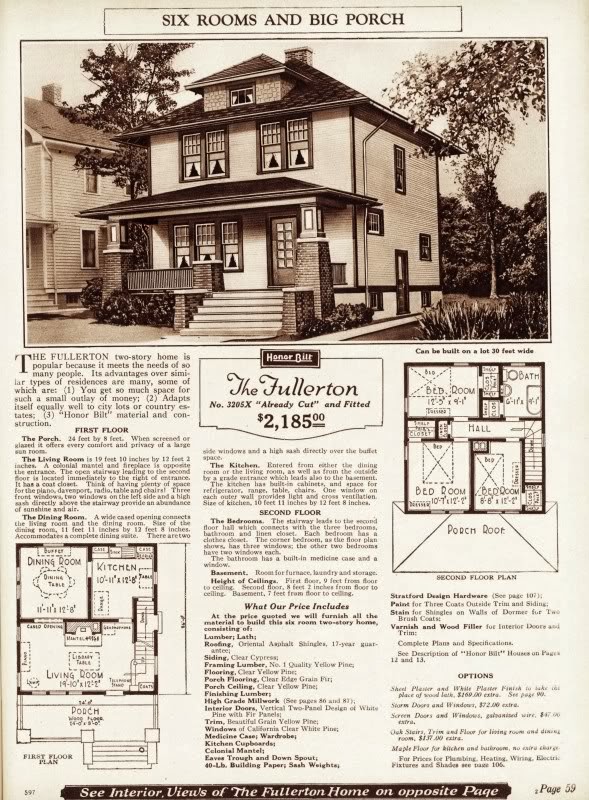
I thought the village needed a greater variety in house styles. I decided to incorporate an American Classic into the mix by choosing a Sears & Roebuck House.  This design is based on a kit house sold through the Sears and Roebuck Catalogue back in the 1920's. The Fullerton was model No. 3205X and it sold for $1633 to $2,294!

Additional Note: For those of you that have been collecting the Ledge Village Series - There has been a pause in new designs, not because I have run out of ideas because I have been traveling. My husband and I just spent 7 weeks driving around the USA.  That trip inspired many things, one of which was to use a Sears & Roebuck design in Ledge Village.  I am blogging about the trip over here on my regular blog so come and visit for more info! And thanks to all of you for your continued support!


Here is the design I worked from.
(Note: I just finished the pattern for the winter tree. I am working on the photos and tutorial now. Should show up on Silhouette in next week's new designs.)


Other files in the Ledge Village series include:
And there are more to come!

Fullerton House Tutorial

Tutorial assembled using Silhouette Software Release 2.7.18. This tutorial assumes you already know how to use the Silhouette and Silhouette software.

Supplies Needed:

  • Template from Silhouette On-Line Store here.
  • Glue dots 3/16"- a few removable ones as well
  • Silhouette Cameo or Portrait
  • Card Stock 

Steps for completing the Fullerton House:


1. Download the cutting file for your Silhouette Cutting machine from the Silhouette Online Store here.

2. Prepare the files:
  • The downloaded Silhouette file for the Fullerton House looks like this. 

  • It is laid out on a 12 x 18" mat and needs to be split into two separate files for cutting. Each file will fit on an 8 x 11" piece of card stock so it will work on both a Cameo and Portrait cutting machine.
  • Copy the house front and paste it into a new file.

  • Copy all the other pieces and paste those into a new file.


3. Cut the files.
  • The settings will depend on the paper you use. I have been using white index card stock and cutting at a speed of 3, a depth of 33 and the blade set to 3.
  • Carefully remove the cut files from the backing mat.
  • Here are the parts for this project. (Fences not included in photo.)


4. Fold the house front.
  • Note each cut file has dotted lines. These are fold lines. 
  • Fold all the dotted lines inward except the front porch floor attached to the bottom of the house. That folds one fold outwards ( toward the front) and the other folds in the opposite direction (toward the back. This is highlighted in the first photo below.

  • All other folds on the house should be made before gluing and these all fold toward the back.


5. Glue the porch floor in place first.
  • I like to use Glue Dots on the edges although other glue types are appropriate. 
  • It is important to make square corners. 
  • You start this house by positioning the porch floor. Fold it into place.
  • There are end flaps on each end of the porch floor. Place a glue dot on each end and glue these in place.

  • There is also a side wall tab on one end that can be folded in and glued.
  • Notice on one side there is a tiny notch cut out of the back.  This is a guide notch to help you in lining up the back before gluing the side wall seam of the house. Locate the notch. The bottom of the side wall should line up with the notch. This will help keep things square.


6. Glue the house together- side, bottom then roof.
  • Glue the side seam first using glue dots.
  • Then the back tab of the porch floor gets glued up and onto the back of the house on the outside.


  • Add glue dots to the tabs on the roof and glue those in place. The roof does slant back.


7. Build the dormer and add to roof.
  • These are the pieces you will need for the roof and dormer.


  • The dormer has multiple tiny folds.
  • The roof sides and dormer sides are all folded back. (Shown below in red.)
  • The holding tabs are all folded forward. (Shown below in blue.)
  • Repeat on the side not visible in the photo as well.

  • The dormer will be placed into the hole on the roof from the back to the front.
  • Fold the tabs on the roof piece back first and then position the dormer in the hole.


  • Place glue dots on the dormer tabs to hold it to the back of the roof piece.
  • Below is an inside view with the dormer in place.


  • Next add the dormer roof. Fold the tabs back and glue on top of the dormer on the front. 

  • Glue the roof with dormer onto the house.

8. Add the porch
  • The top tab and bottom tab on the porch get folded toward the back.

  • Line up the bottom tab. It will get glued onto the bottom of the house and the edges line up.


  • Fold the porch fence railing toward the back and then around the back and glue in place.
  • Do this on both sides.


Note: The top tab is not glued to the house. It will be glued to the porch roof in the next step.
  • Fold all tabs on the porch roof toward the back.

  • Adding the porch roof is a great place to use removable glue dots. The positioning is tricky.
  • It gets glued about 1/8" below the upper story window and it is centered.

  • Once you have the upper tab of the roof in place, add glue dots to the tab on the porch top and to the side tabs on the porch roof and glue all those in place. The side tabs are folded in and get glued to the house. The upper porch tab gets glued to the under side of the porch roof.

Add a few side fences and your Fullerton Sears & Roebuck home is ready to be added to Ledge Village!


**********
© 2013 Marji Roy, Ashbee Design


10.28.2013

Moose and Tree • Silhouette Tutorial

Hello everyone! I have been missing from the Silhouette world for two months because we went on a road trip! My husband and I have just returned from 8 weeks of seeing America, and it is a beautiful country. My Silhouette did not travel with us so all projects have been on hold. And my computer died 1 week into the trip so blogging became too challenging! I am home again, although still processing mail, bills, etc. Here is a project from last year before I was publishing my files. I saved it until now because it really is a fall/winter subject and not a summer one!

Our trip was beyond wonderful but it is good to be home. For those of you waiting for more Ledge Village files stay tuned. I haven't forgotten you!

Project Description:
One of the early projects I designed and created using my Silhouette was this moose and fir tree grouping. I created it as a thank you gift because we were staying in a friend's mountain home for a winter holiday. Here is the original, on the mantel of this lovely home.


I redesigned the files after I had learned a little more about the silhouette and this time photographed the assembly process for the blog. I learned the trees needed to be simplified to reduce cutting problems.


Moose and Fir Trees Tutorial:

Tutorial assembled using Silhouette Software Release 2.7.18. This tutorial assumes you already know how to use the Silhouette and Silhouette software. It can be cut on both Cameo and Portrait Silhouette machines.

Supplies Needed:

  • Template from Silhouette On-Line Store here.
  • Glue dots 3/16"
  • Spray Glue
  • Silhouette Cameo or Portrait
  • Card Stock

Steps for completing the Moose project:

1. Download the cutting file for your Silhouette Cutting machine from the Silhouette Online Store here.


2. Prepare and cut the file.
  • You need to decide on the card stock and colors you want to use. I especially liked the simplicity of all white but did use brown for the moose for display purposes on the online store.
  • The pieces needs to be copied and pasted into a new separate file depending on your paper size and the cutting machine you are using. All will fit onto 8.5 x 11" card stock.
  • Trees can be combined to make the best use of your card stock. If gluing your trees together you will need to cut 4 of each size.  If sewing the center seam on a sewing machine, you will only need 2 but remove the center fold line from the cut. More on this in the directions below.
  • Paper choices: The moose is a happier critter if cut from a heavier card stock. I used 110 lb. index stock.
  • The trees are a detailed cut and will require a sharp blade and good mat, but also a smoother paper. Complex cuts like these cause problems with papers that are too fibrous. You might want to experiment on some samples before cutting.
  • Cut your pieces from the card stock you choose.


3. Assemble the moose.
  • Note each cut file has dotted cut lines. These are fold lines. 
  • Fold the moose in half along the fold lines on its back. The connector tab on the back first forms a hump...

  • But then double fold it down in between its sides like this:
  • A glue dot placed in the nose between the halves will hold it in place.
  • The file does not include a slit for inserting the antler rack on the head although it does have one on the antler rack.  This is to allow you more flexibility in assembly.  You can change the character of the moose by altering the angle of the antlers just a little bit.  If you want to make an arrangement with multiple moose, then change the sizes of the moose and the angle of the antlers  just a little and they will look different.
  • Use scissors to cut a slot in the top of the head about 1/4" down and slide the antlers into place.


  • You can curl and bend the card stock of the antlers and the body of the moose to give it more personality.

4. Assemble the trees:


The trees can be assembled in one of two ways depending on the equipment you have.  

Using a sewing machine:
  • I like to sew them up the center seam using a sewing machine because then I only need to cut two trees.  The trees take a long time to cut and I have created many of them for various scenes. I like to save time.
  • Remove the center fold line from the cut pattern by clicking on it, going up to the OBJECT menu in the Silhouette Software and ungrouping it. Then click on the center line and delete.
  • Cut two tree files of the same size and stitch up through the center to join them.
  • Fold it open and you have a tree.


Using Spray Glue:
  • The alternative method of creating 3-D firs trees is to cut 4 trees of the same size. (Note only three are shown in the photo - but yes, you need 4!)
  • Fold them on the center  dotted fold line.


  • Assemble them in the following arrangement. This is the view from the bottom. The four trees form an X when viewed from the bottom. Spray glue the backs, one at a time and then quickly place them together.


  • This technique creates a more robust tree.
5. Make a smaller tree.
  • Repeat the steps above with a smaller tree file to complete the arrangement.


And then find a beautiful location to show it.


**********
© 2013 Marji Roy, Ashbee Design


9.15.2013

Contour Cards • Silhouette Tutorial

Cutting files should be available at the online store on Tuesday 9/17/2013

Project Description: 
I have designed a series of all-occassion greeting cards using a design concept inspired by contour lines on a map. Combining that linear element with using papers in gradated colors creates a stunning card design that is easy to cut and assemble. The series includes a variety of themes but all have a strong graphic element and the distinctive contour lines created by stacking cut paper.  Most of the designs provided both a positive and negative shape both of which can be used resulting in two cards.


The first series I am releasing (and the ones used to create this tutorial) is the Sun, Star, Arrow series shown below.  This tutorial applies to all of the contour card designs. The process is the same. The shapes are different.

  • Cutting File for Geometric Sun here.
  • Cutting File for Arrow here.
  • Cutting file for Triple Star here.


Here are the file images. Each image shows the two possible designs from the one file download plus little gray images that show the actual cut shapes and how many there are.
Contour Card -Geometric Sun

Contour Card - Arrow

Contour Card - Triple Stars


  • These cards are sized to fit in standard computerized invitation sized envelopes (4 1/4" x 5 1/2") so you can quickly create beautiful cards to send or to group and give as gifts. A collection of these would be a perfect hostess gift or a thank you gift to a teacher. Or how about getting some Christmas gifts done. These would be perfect for the neighbor, or the surprise person.


Group 2:
The second group of designs is a puncutation series including the ampersand, question mark and dollar sign. 
  • Cutting file for Ampersand Contour Card here.
  • Cutting file for Dollar Sign Contour Card here.
  • Cutting file for Question Mark Contour Card here.


Group 3:
The third group of designs continues with the puncutation series. I find these shapes beautifully graphic and so appropriate for many types of cards. It includes the exclamation point, the hashtag and the @ sign. 
  • Cutting file for @ sign Contour Card here.
  • Cutting file for Hashtag Contour Card here .
  • Cutting file for Exclamation Point Contour Card here .


Note:
I am a new Silhouette Contributing Artist. Both my Silhouette files and this website are the beginning. Send along any suggestions, problems, ideas or photos as we learn to create together. I'd love to hear from you!  Marji Roy 
eMail: ashbeedesignemail@gmail.com
Tutorial assembled using Silhouette Software Release 2.7.18. This tutorial assumes you already know how to use the Silhouette and Silhouette software.

Supplies Needed:

  • Template from Silhouette On-Line Store here (Coming soon).
    • Sunburst file
    • Arrow file
    • Triple Star File
  • Spray adhesive
  • Silhouette Cameo or Portrait
  • Card Stock - in many colors

Steps for completing the Contour Cards:

1. Download the cutting file for your Silhouette Cutting machine from the Silhouette Online Store (Link above).

2. Prepare the files:
  • The downloaded Silhouette file for the Contour Stars Card looks like this. 
  • Different designs have different numbers of layers. Some have 4, 5 or 6.


3. Separate the files. 
  • Copy each layer and paste it into its own new file.
  • Each layer must be cut from a different color of card stock.
  • You can duplicate each file and paste it 4 times on a 8 1/2 x 11 sheet of card stock and make 4 matching cards at once. This is a great time saver if you are making collections to give as gifts.

4. Cut the files.
  • The settings will depend on the paper you use. I have been using card stock and cutting at a speed of 3, a depth of 33 and the blade set to 4.
  • Cut each layer from a different color.
  • Carefully separate the parts and stack them up. It is easy to flip things over and then they won't match as precisely so work with an organized approach.
  • I also mark the back side and the top with just a pen dot, especially the circular designs like the radial sun. It helps from getting them mixed up if you accidentally drop them all on the floor.

5. Create the card backing.
  • These designs are made to fit on a 1/2 sheet of 8 1/2 x 11 card stock.
  • Choose a background color and cut it in half the short way using a paper cutter.
  • Crease the fold seam using a bone folding tool. 
  • Fold in half. Make two.
  • Below are all the parts from the arrow pattern. It will make two cards 


6. Set-up a spray adhesive location. 
  • Here is mine:
  • I work in my sunroom with all the doors open for good ventilation.
  • I cover the table and floor with plastic ( I save old shower curtain liners for this purpose.)
  • I set-up a recycled large cardboard box as my spray booth.
  • I cut newspaper to use to spray on.
  • I have an assembly area off to the side.

6. Assemble the cards. 
  • I put the first two layers face down and spray the back side.


  • I quickly and carefully position it on the white folded card and press. Alignment is important.

  • Quickly add the second color carefully lining up the outside edges. They match perfectly. The center stagger is correct if you line up the outsides.

  • Continue with each layer until all are in place.

  • Then do the same with the negative shapes on another piece of folded card stock.
  • You can be creative with these pieces. Here I staggered the arrows instead of placing them exactly on top of each other.

  • I liked that dynamic better for this shape..

  • Here are the two finished cards for the Arrow Contour Card File


  • Here are the Stars Contour Card file completed:

  • Here are examples of the Geometric Star file. For those I stacked the negative shapes directly on top and didn't stagger them.


  • And I experimented with different color combinations.


Have fun with it!

**********
© 2013 Marji Roy, Ashbee Design