It is up finally. Link to the Haunted House cutting file here! And the Tower House cutting file here!
Project Description:
The Ledge Village is series of 3D buildings and accessories that can be combined in a mix and match fashion to build tiny villages on small ledges around your home. The buildings are thin, with all detail on the front so they fit on small trim ledges. This tutorial is for the haunted mansion and the Tower House. I designed the haunted house first but then requests came in to make the same design in an unhaunted version. It is called the Tower House. The haunted house works well as a stand alone project for the Halloween season. Or you can combine it with other buildings to create an entire village. There are two files for this project. One includes the house and other includes the haunted tree, fences and grave marker.


An the "unhaunted" version!
.jpg)
- 3D Fire House • Tutorial
- 3D Store 2 and Park Bench • Tutorial
- 3D Dormer House • Tutorial
- 3D Train Station • Tutorial
- 3D Backyard Necessities - Outhouse and Swing • Tutorial
- 3D Store and Gazebo File • Tutorial
- 3D Barn File • Tutorial
- 3D School House File • Tutorial
- 3D Church File • Tutorial
- 3D Cottage File • Tutorial
- 3D Two Story House File • Tutorial
- 3D Greek Revival House File • Tutorial
Haunted Mansion Tutorial
Note:
I am a new Silhouette Contributing Artist (getting less so with each new edition!). Both my Silhouette files and this website are the beginning. Send along any suggestions, problems, ideas or photos as we learn to create together. I'd love to hear from you! Marji Roy
eMail: ashbeedesignemail@gmail.com
Tutorial assembled using Silhouette Software Release 2.7.18. This tutorial assumes you already know how to use the Silhouette and Silhouette software.
Supplies Needed:
- Template from Silhouette On-Line Store.
- Haunted House cutting file here • House Tutorial Below
- Tree cutting file here • Tree Tutorial HERE
- Unhaunted version here
- Glue dots 3/16"
- Silhouette Cameo or Portrait
- Card Stock - gray and black
Steps for completing the Haunted Mansion:
Note: This tutorial is separated into three blog posts because of the number of photographs.1. Download the cutting file for your Silhouette Cutting machine from the Silhouette Online Store here. There are two files to get.
2. Prepare the files:
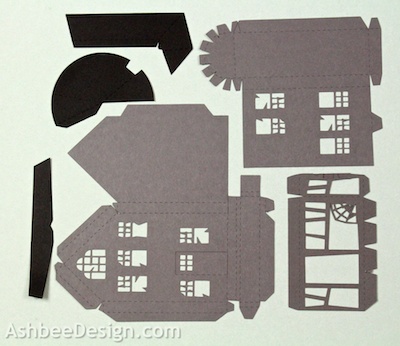
- The downloaded Silhouette file for the haunted mansion looks like this EXCEPT ALL LINES ARE RED. The parts fit on the 8.5 x 11" paper so it will work on both Cameo and Portrait cutting machines without resizing. You will have to separate pieces by copying and pasting into new files to use smaller paper but also to use different colors. In my sample all the items shown in blue below were cut from dark gray and all the items shown in red were cut from black. Other combinations would work as well.

- The settings will depend on the paper you use. I have been using card stock and cutting at a speed of 3, a depth of 33 and the blade set to 3.
- Carefully remove the cut files from the backing mat.
- Here are the parts for this project. Notice, I chose to cut the roof pieces out of black and all the other pieces out of dark gray.
4. Fold the mansion main building.
- Note each cut file has dotted lines. These are fold lines.
- Fold all the dotted lines inward except the porch floor. That folds in the opposite direction coming forward from the building.

5. Glue the base and porch floor together.
- I like to use Glue Dots on the edges although other glue types are appropriate.
- It is less important to make square corners on this design because slightly crooked adds to the haunted feel.
- You start this building by positioning the floor. Fold the floor forward, then down, then back. Fold in the end and glue in place.

- Fold over the building side and glue that tab in place.

- The other end of the porch floor is different because there is a wrap around porch on this end.
- The large end tab gets glued on top to blend the edges together after you have folded it into position.

- After the floor is together, glue the peak tab together.

- Then add glue dots to all of the tabs on the back. This includes the bottom, one long side and two roof tabs.

- Postion the back over the glue dots and press to hold. Notice there is a tab sticking out to the side. This is where the tower will attach.

6. Assemble the tower and attach:
- Fold along all the fold lines of the tower. All things get folded in expect one little center tab at the top.

- Start by gluing the cross brace at the top in place. It folds forward and then the two side tabs are glued.

- Fold up the tabs on the bottom circle of the tower. Put a glue dot on every one.

- Wrap the tower wall around the base attaching it to these glue dots as you go.
- When you get to long edge, add glue dots there and glue the tower wall in place.

- The cone for the tower roof is flat on the back. Fold on the dotted lines. ( Note, I moved the location of the split board in the roof after taking this photo. It is further to the right so it won't interfere with the tab.

- Glue the back of the tower roof to the back of the tower.

- Glue the front tab on the tower to the underside of the roof to hold the cap down.

- Glue the tower to the main mansion building. Put glue dots along the side of the building but also on the connector tab on the backside.

- Back view of connected tower:

I am separating this tutorial into three blog posts because of the number of pictures.
Click HERE to get instructions on adding the front porch.
Click HERE for instructions on assembling the haunted tree and grave stone.


**********
© 2013 Marji Roy, Ashbee Design
Great file - on my "to do" list. And I can't wait to start making your village files - they will go with the Welcome to the North Pole quilt that I made my daughter a couple of years ago. You wouldn't happen to have an ice cream cone shaped store planned for the future, would you? LOL. Thanks for your wonderful files.
ReplyDeleteThere are a lot of buildings that have been requested but this is the first for and ice cream shaped building!
DeleteI love the whole ledge series. My only issue is - this one (I haven't checked the others yet) doesn't fit completely on a 12x12" piece of paper (the house part, not the roof sections). There is a tiny bit hanging off the edge of the paper. I'm going to size all pieces down very slightly, but I just thought I would mention it in case it was an issue you weren't aware of - perhaps something was sized incorrectly on the download site or something.
ReplyDeleteWould these work on a thin cardboard, like cereal box type?
ReplyDeleteI haven't tried it. I think you could do it with the simpler buildings of Ledge Village like the Cottage, Greek Revival, Store. I think you will run into discrepancies with the Haunted house, train station, library.
DeleteHi Marji! I loved your Haunted House so much, I've used it for my Doodlebug Shadow Box project. You can find the result on their blog here: http://www.doodlebugblog.com/2013/09/shadow-boxes-halloween-parade_24.html Thanks for your awesome cutfile!!
ReplyDeleteHello Monique, Nice job! I have added it over on my sharing page here.
DeleteSo excited! We live in an Alaskan cabin with tons of wood trim and ledges! I am just so excited to use this design! The word that comes to mind is BRILLANT! Great job :) Hope to see more in the ledge series (I splurged and bought them all... I am thinking x-mas village)
ReplyDelete