Project Description:
I have designed a series of all-occassion greeting cards using a design concept inspired by contour lines on a map. Combining that linear element with using papers in gradated colors creates a stunning card design that is easy to cut and assemble. The series includes a variety of themes but all have a strong graphic element and the distinctive contour lines created by stacking cut paper. Most of the designs provided both a positive and negative shape both of which can be used resulting in two cards.

The first series I am releasing (and the ones used to create this tutorial) is the Sun, Star, Arrow series shown below. This tutorial applies to all of the contour card designs. The process is the same. The shapes are different.
- Cutting File for Geometric Sun here.
- Cutting File for Arrow here.
- Cutting file for Triple Star here.
Here are the file images. Each image shows the two possible designs from the one file download plus little gray images that show the actual cut shapes and how many there are.

Contour Card -Geometric Sun

Contour Card - Arrow

Contour Card - Triple Stars

- These cards are sized to fit in standard computerized invitation sized envelopes (4 1/4" x 5 1/2") so you can quickly create beautiful cards to send or to group and give as gifts. A collection of these would be a perfect hostess gift or a thank you gift to a teacher. Or how about getting some Christmas gifts done. These would be perfect for the neighbor, or the surprise person.
.jpg)
Group 2:
The second group of designs is a puncutation series including the ampersand, question mark and dollar sign.
- Cutting file for Ampersand Contour Card here.
- Cutting file for Dollar Sign Contour Card here.
- Cutting file for Question Mark Contour Card here.


Group 3:
The third group of designs continues with the puncutation series. I find these shapes beautifully graphic and so appropriate for many types of cards. It includes the exclamation point, the hashtag and the @ sign.
- Cutting file for @ sign Contour Card here.
- Cutting file for Hashtag Contour Card here .
- Cutting file for Exclamation Point Contour Card here .


Note:I am a new Silhouette Contributing Artist. Both my Silhouette files and this website are the beginning. Send along any suggestions, problems, ideas or photos as we learn to create together. I'd love to hear from you! Marji Roy
eMail: ashbeedesignemail@gmail.com
Tutorial assembled using Silhouette Software Release 2.7.18. This tutorial assumes you already know how to use the Silhouette and Silhouette software.
Supplies Needed:
- Template from Silhouette On-Line Store here (Coming soon).
- Sunburst file
- Arrow file
- Triple Star File
- Spray adhesive
- Silhouette Cameo or Portrait
- Card Stock - in many colors
Steps for completing the Contour Cards:
1. Download the cutting file for your Silhouette Cutting machine from the Silhouette Online Store (Link above).2. Prepare the files:
- The downloaded Silhouette file for the Contour Stars Card looks like this.

- Different designs have different numbers of layers. Some have 4, 5 or 6.
3. Separate the files.
- Copy each layer and paste it into its own new file.
- Each layer must be cut from a different color of card stock.
- You can duplicate each file and paste it 4 times on a 8 1/2 x 11 sheet of card stock and make 4 matching cards at once. This is a great time saver if you are making collections to give as gifts.
4. Cut the files.
- The settings will depend on the paper you use. I have been using card stock and cutting at a speed of 3, a depth of 33 and the blade set to 4.
- Cut each layer from a different color.
- Carefully separate the parts and stack them up. It is easy to flip things over and then they won't match as precisely so work with an organized approach.
- I also mark the back side and the top with just a pen dot, especially the circular designs like the radial sun. It helps from getting them mixed up if you accidentally drop them all on the floor.
5. Create the card backing.
- These designs are made to fit on a 1/2 sheet of 8 1/2 x 11 card stock.
- Choose a background color and cut it in half the short way using a paper cutter.
- Crease the fold seam using a bone folding tool.
- Fold in half. Make two.
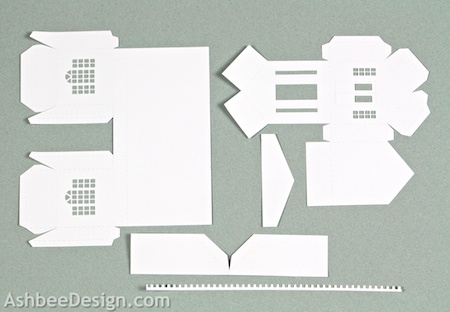
- Below are all the parts from the arrow pattern. It will make two cards

6. Set-up a spray adhesive location.


- Here is mine:
- I work in my sunroom with all the doors open for good ventilation.
- I cover the table and floor with plastic ( I save old shower curtain liners for this purpose.)
- I set-up a recycled large cardboard box as my spray booth.
- I cut newspaper to use to spray on.
- I have an assembly area off to the side.
6. Assemble the cards.
- I put the first two layers face down and spray the back side.
- I quickly and carefully position it on the white folded card and press. Alignment is important.
- Quickly add the second color carefully lining up the outside edges. They match perfectly. The center stagger is correct if you line up the outsides.
- Continue with each layer until all are in place.
- Then do the same with the negative shapes on another piece of folded card stock.
- You can be creative with these pieces. Here I staggered the arrows instead of placing them exactly on top of each other.
- I liked that dynamic better for this shape..
- Here are the two finished cards for the Arrow Contour Card File

- Here are the Stars Contour Card file completed:
.jpg)
- Here are examples of the Geometric Star file. For those I stacked the negative shapes directly on top and didn't stagger them.


- And I experimented with different color combinations.

Have fun with it!
**********
© 2013 Marji Roy, Ashbee Design
.jpg)
.jpg)


.jpg)


.jpg)


.jpg)


