Project Description:
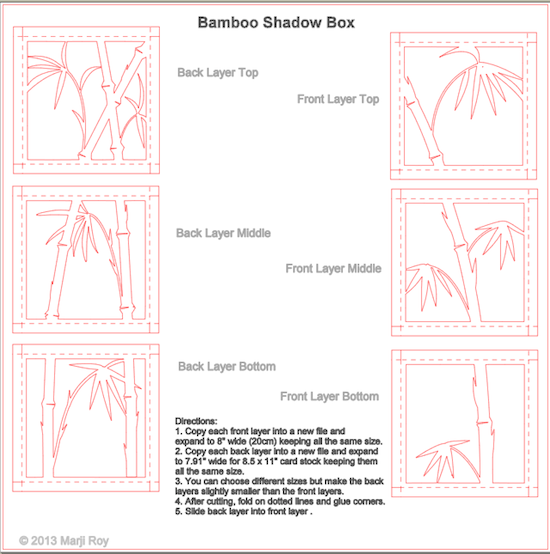
Based on Chinese brush painting, this is a composition of contemporary bamboo branches. This Silhouette file is a combination of six parts assembled and displayed together to create a larger piece of wall art using a shadow box technique. This is approach allows you to create larger designs from standard sized 8.5 x 11 card stock.
Tutorial assembled using Silhouette Software Release 2.7.18.
Note:
I am a new Silhouette Contributing Artist. Both my Silhouette files and this website are just the beginning. Template links will be updated once the file is live on Silhouette. Send along any suggestions, problems, ideas or photos as we learn to create together. I'd love to hear from you! Marji RoyeMail: ashbeedesignemail@gmail.com
Supplies Needed:
- Template from Silhouette On-Line Store here.
- Glue dots 3/16"
- Silhouette Cameo
- 6 sheets of 8 1/2" x 11" Index Card Stock
- Blue Tack Wall Adhesive (optional)
Steps for completing the 3-D Bamboo Shadow Box project:
6/30/2013 Important note: A kind crafter just let me know of an error in the bamboo back layer bottom ( the frame in the lower left corner). There is an extra cut line. I have added steps in the process below to show you how to fix it. I will send an updated file to Silhouette but these instructions are for those of you that already downloaded the file. It is an easy fix.1. Download the cutting file for your Silhouette Cutting machine from the Silhouette Online Store here. All of the patterns for this project are in Silhouette download. They need to be separated and expanded. You will find some basic instructions included in the file. Below are some more detailed instructions with photographs.
2. Prepare the files:
The downloaded Silhouette file looks like this. Each of the six parts has to be copied, pasted into a new Silhouette file and enlarged.
- Right click on the Front Top and COPY it.
- Open a new Silhouette File by going to the FILE MENU and selecting NEW.
- Go up to the EDIT MENU and select PASTE.
- These patterns were designed to fit on a standard 8.5 x 11 sheet of card stock so switch the page size to that selection. The PAGE settings are reached by clicking on the red square icon.
- Select Letter 8.5 x 11 in.
- Click and drag from the lower corner to expand the design to 8". It will be close but not exact. It doesn't matter what the exact size is but it is important that they all be the same!
- Repeat this step with all three front layers in the original download.
- Save the file giving each layer a clear identifying name.
- Sizing note: You can make the shadow box smaller. Just make sure all three front patterns are the same size.

- Do the same with the three back files but they need to be SLIGHTLY SMALLER than the front layers. The back layers will create boxes that slide into the front layers. If they are the same size they will buckle slightly. Decrease the size of the backs layers by enough to prevent this. The amount depends on the thickness of your selected paper. The thicker the paper, the greater the size difference. I used standard 65 lb card stock and decreased the size of the back boxes by1/10 (.1). I resized them to approximately 7.9".
To fix the error in the Back Layer bottom do the following.
- a. Enlarge the frame as noted above.
- b. Look in the lower right corner. You will see one of 2 things - You may see a slit across the bottom of that bamboo stalk, or you may see a little added box.
- c. If you see the little extra box, click on it once and delete it.

- d. You will then see the extra slit across the bottom.

- e. To remove that, click on the file so it is selected. The size handles show when it is selected.
- f. Go up to the OBJECT menu and down to UNGROUP. (If you do not ungroup, the eraser tool acts wonky. I just learned this as I was working on this fix.)
- g. Enlarge your view. This is much easier zoomed in. Click on the zoom tool to get in close.

- h. Select the Eraser tool from the left tool bar.

- i. Erase the extra cut line. Just drag the eraser along it. Get as close to the left and right edge as you can but don't go all the way to the edge.

- j. The diagram above shows the problem cut. The diagram below shows the corrected view.

- k. Select everything and regroup ( OBJECT menu to GROUP).
As I said at the beginning, I am just learning, too. I apologize for the error in the file and hope it didn't cause you any problems. Hope your Bamboo Shadow box comes out beautifully.
3. Cut all 6 files.
- These are the cut settings I used with the 65 lb card stock used on this project.

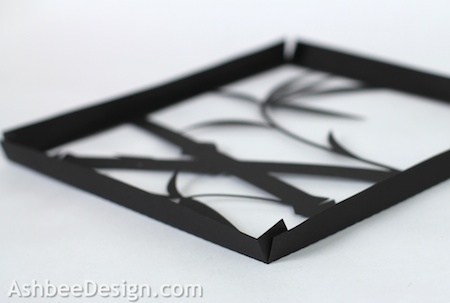
4. Fold boxes.
- Note each cut file has dotted lines. These are fold lines.
- Fold all sides UP to form the box.
- Be carefull to always fold in the same direction. The design will not line up if you flip one portion over and fold in the opposite direction.
- Refer to the image below. You can lay them out this way, or reverse them all.

- Place all your cut outs in a matching order and then fold all flaps up, creasing the seams.
- Fold the tabs on each corner to the inside.
5. Glue Corners


.jpg)

- I like to use Glue Dots on the corners although other glue types are appropriate.
- It is important to make square corners.

6. Assemble each of the pairs.
- The bottom front slides over the bottom back.
- The middle front slides over the middle back.
- The top front slides over the top back.
- Glue each front to each back using glue dots.
7. Arrange in top to bottom order and place on the wall.
- I use Blu Tak or a similar product to attach to the walls with a material that doesn't damage the wall and is easy to re-position.
**********
© 2013 Marji Roy, Ashbee Design
This is really nice! I'm waiting for my silhouette to ship. This is one project I'd like to try.
ReplyDeleteThanks. It is relatively easy to do but shouldn't be the first project out of the box. It took me a while to understand paper thickness and cutting settings. Work on something smaller so you don't waste a lot of paper. My first papers tore because I didn't have a grasp of the stickiness of the mat when it is brand new. Once you understanding the settings for the paper you want to use, give it a whirl! Send pics once it is hanging in your house. Love to see it.
DeleteMarji, I sent you an email about this file. Hope it helps. Thanks.
ReplyDeleteple sent dxf file plesce
ReplyDeleteThis file hasn't been created in a program that allows for a dxf export. I have other shadow box files that do have the dxf format in there download. They are here - http://3dcuts.com/shadow-boxes-nature-themes/
Delete