Project Description:
This shadow box is composed of 4 cut files assembled in layers to create an early spring shadow box showing those first crocus' bravely jutting out of the snow. This file does have pieces requiring a Cameo cutting mat however the entire file can be reduced to fit on a Portrait cutting mat. The Cameo size is about 7.25" square. The Portrait version would be about 6" square.

Crocus' in the Snow Shadow Box Tutorial
Tutorial assembled using Silhouette Software Release 2.7.18. This tutorial assumes you already know how to use the Silhouette and Silhouette software.Supplies Needed:
- Template from Silhouette On-Line Store here.
- Glue dots 3/16"
- Silhouette Cameo
- 12" x 12" Card Stock - 1 Black, 3 White,
- 8.5 x 11" card stock - 1 green, 1 purple
- 7" square gradated paper for sky - blue works as well as clouds
- Paper Glue
Steps for completing the 3-D Crocus Shadow Box project:
 1. Download the cutting file for your Silhouette Cutting machine from the Silhouette Online Store. All of the patterns for this project are in Silhouette download. They need to be separated. Below are some detailed instructions.
2. Prepare the files:
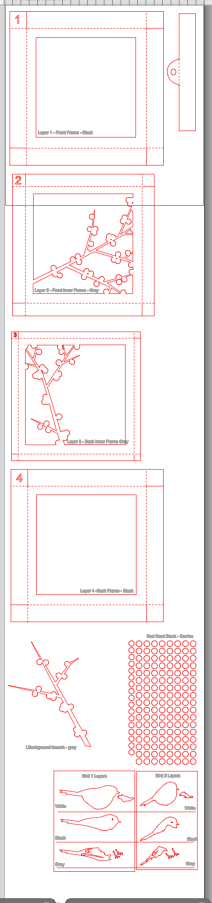
- The downloaded Silhouette file looks like this. Each of the 4 frame parts has to be copied and pasted into a new Silhouette file.
- The file probably arrives all grouped together. Click on it so it is selected and go up to the OBJECT Menu and down to UNGROUP.
- Click on each frame/ grouping and copy it - EDIT menu to COPY. Make sure you get all the pieces and that none are left behind.
- Open a new file - FILE Menu to NEW and paste the frame into it. You can group any like parts together. I grouped Frame 3 with the back snow hill.
- Copy the other parts to new files and cut like colored objects together. All are marked on the file. Note: the gray letters do not cut.
This file is designed to work on the Cameo Cutting machine because several of the parts are wider than 8". You can group the entire file and shrink it together and try it on a Portrait but the final project will be smaller - about 6" across when complete.
3. Prepare and fold frames. Start with frame 1.
- Note each cut file has dotted lines. These are fold lines.
- Note the cut out number. This should be in the upper left corner. All frames are numbered to help in the instructions and construction. Always make sure the corner with the number cutout is in the upper left corner.

- Fold frame 1 sides BACK away from the front along all fold lines. Not all frames get folded in the same direction so pay attention!
- I like to use Glue Dots on the corners although other glue types are appropriate.


- It is important to make square corners.
- Add the hanger. This is optional.
- It gets folded and glued to the inside top of frame 1.
- Make sure to center it.

4. Assemble frame 2 and 3.
- Frame 2 and 3 are both completed in the same way. With the cut-out number identifying the frame in the upper right corner, fold BACK on the dotted fold lines. ( Note the numbered corner will be in the upper right when looking at the backside.) Glue all corners in place. Here is frame 2 from the back.

- And frame 3 from the front..

- Fold frame 4 sides FORWARD toward the front.
- Glue all corners together with glue dots keeping them square.

- Layer 4 has a background sky added. I used a paper with a gradation cut to 7 x7 ", but there are many other alternatives that can be used. Glue it into the frame on all sides.

- The most distant snow mound is glued directly onto the inside of the back frame as well.

6. Slide the frames together to get a placement understanding for the 4 crocus groups.
- The crocus groups can be arranged in any way you like. I will guide you in the way I did it but there are other variations that will be just as effective.
- Start by determining where each will be placed and which side will be to the front.
- First slide the frames together WITHOUT gluing them. Number 4 goes on the back facing front, 3 gets slide inside # 2 from the back, and the the combine unit of 2 and 3 slides inside #4. Finally #1 (black) slides around all of them from the front. The schematic below shows how the frames nest together. Frame 1 is black, 2 is blue, 3 is green and 4 is red in this drawing.

- Place (without gluing) the various leaves groupings. Determine where you would like them and which side of each should be the front. Keep track of the front side.

7. Assemble the crocus flowers.
- Each grouping has 1 crocus bud. the thee larger crocus buds are each made up of 3 purple petals - small, medium and large. the tiniest has only 2.

- The large one is the back piece. To that glue the small one on one side with its point hanging out to the side a little bit.

- Glue the medium sized petal on the other edge, with its point clearly showing as well. It should over-lap the other petal.

- This bud gets glued onto the BACK of the green leaves grouping behind the stem with the thick top.

- Repeat for all crocus groupings.

7. Attach the crocus groupings to the frame bases.
- You can certainly use artistic license here and arrange the crocus groupings in any arrangement that suits you. I recommend using removable glue dots so you can reposition them a few times, and then a permanent glue dot once you have decided. Here is what I did:
- The smallest grouping was put in the right corner of base # 3 tucked right up against the edge.

- A middle sized grouping was inserted into the pre-cut slit also on frame #3 and glued from behind.

- The third medium grouping was place on the back side of frame # 2 placed so it was between the previous 2.

- The largest grouping was placed in the lower left corner of frame #1 so the leaves extended outside the frame.

- Here is a detail of my arrangement.

8. Assemble the frames.
- Once you are satisfied with the crocus placement, assemble the frames one last time, this time with glue dots to hold them in place.
- Start by gluing frame 3 inside of frame 2 but line their back edges up. I used 3 glue dots on each side and avoided adding them to the corners. The corners already have a double paper layer so added glue dots gets a little thick there.

- The frame grouping of 2 and 3 then gets slide down into frame 4 with frame 4's edges extending out toward the front.

- If you are confused remember this diagram showing how things fit together: Frame 1 is the black one on top.

- Glue frame 1 on top of the frame 2-3-4 grouping.

- Standing it up an admire your work!

.jpg)
.jpg)

**********
© 2014 Marji Roy, Ashbee Design
Sharing this post at some of these link parties. They are worth checking out for other ideas.
Motivate Me Monday, Mop It Up Monday, Alderberry Hill, Metamorphis Monday, Tuesday Treasures,Today's Creative Blog, A Bowl Full of Lemons, Not Just a House Wife, The Inspiration Board, Romancing on a Dime, DIY Dreamer, Whatever Goes Wednesday, Transformation Thursday, House of Hepworths, Craftberry Bush, Jennifer Rizzo, One Artsy Mama, Craftionary, Flaunt in Friday, Tater Tots and Jello, Show and Tell Saturday, DIY Showoff, I Gotta Try That, Kathe With an E, The Girl Creative, Weekend Re-Treat

.jpg&description=Ashbee%20Design%20Silhouette%20Tutorial%20-%20Winterberry%20and%20Chickadee%20Shadow%20Box%20Paper%20Art)