Project Description:
This shadow box is composed of 4 cut files assembled in layers to create a winter shadow box including two chickadees perched in a winterberry bush.

.jpg&description=Ashbee%20Design%20Silhouette%20Tutorial%20-%20Winterberry%20and%20Chickadee%20Shadow%20Box%20Paper%20Art)

Winterberry Shadow Box Tutorial
Tutorial assembled using Silhouette Software Release 2.7.18. This tutorial assumes you already know how to use the Silhouette and Silhouette software.Supplies Needed:
- Template from here.
- Glue dots 3/16"
- Silhouette Cameo
- 12" x 12" Card Stock - 2 Black, 3 Gray, 1 red, 1 white
- 7" square gradated paper for sky - blue works as well or clouds
- Markers, Orange, Yellow, Black
- Paper Glue
Steps for completing the 3-D Butterfly Shadow Box project:
 1. Download the cutting file for your Silhouette Cutting machine from the Silhouette Online Store. All of the patterns for this project are in Silhouette download. They need to be separated and expanded. Below are some detailed instructions with photographs.
2. Prepare the files:
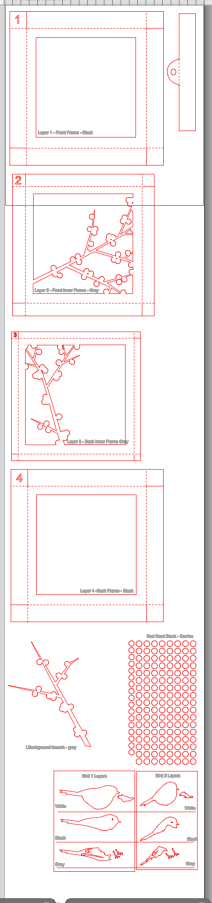
- The downloaded Silhouette file looks like this. Each of the 4 frame parts has to be copied and pasted into a new Silhouette file and enlarged.
- The file probably arrives all grouped together. Click on it so it is selected and go up to the OBJECT Menu and down to UNGROUP.
- Click on each frame/ color group and copy it - EDIT menu to COPY.
- Open a new file - FILE Menu to NEW and paste the frame into it. You can group any like parts together. I grouped Frame 1 with the hanger and the black bird parts.
- Copy the other parts to new files and cut like colored objects together. All are marked on the file. Note: the gray letters do not cut.
This file is designed to work on the Cameo Cutting machine because several of the parts are wider than 8". You can group the entire file and shrink it together and try it on a Portrait but the final project will be small.
3. Prepare and fold frames. Start with frame 1.
- Note each cut file has dotted lines. These are fold lines.
- Note the cut out 1. This should be in the upper left corner. All frames are numbered to help in the instructions and construction. Always make sure the corner with the number cutout is in the upper left corner.

- Fold frame 1 sides BACK away from the front along all fold lines. Not all frames get folded in the same direction so pay attention!
- I like to use Glue Dots on the corners although other glue types are appropriate.


- It is important to make square corners.
- Add the hanger. This is optional.
- It gets folded and glued to the inside top of frame 1.
- Make sure to center it.

- Box 1 is the easiest. It is now complete.
4. Assemble frame 2 and 3.
- Frame 2 and 3 are both completed in the same way.
- Before folding, glue red dots to the front of all the winterberry gray circles.
- Just add a dot of glue and stick on a berry. Some will overlap.


- Now turn frame 2 over and add 4-5 berries on the backside. You want to place them so parts are visible from the front.

- This just adds another visual layer to the branches. It's a tiny detail but it is effective.

- Fold frame 2 sides BACK from the front along all fold lines.
- Glue the corners with Glue Dots being sure to keep them square.

- Repeat the same steps with Frame 3.
- Glue berries on the front (keep #3 in upper left), glue a few on the back, fold all fold lines to the BACK and glue the corners square.

- Fold frame 4 sides FORWARD toward the front.
- Glue all corners together with glue dots keeping them square.

- The four frames are together now.

6. Complete the details on the background.
- Most of my shadow boxes to date have had open backgrounds. This one doesn't. There is a sky layer with another branch attached to it. This get inserted into frame 4.
- Glue red berries onto the front of the single branch.

- Add a few to the back, just like you did on frames 2 and 3.

- Cut the background paper into a 7 inch square. I used a gradated paper from the collection (we all have paper collections, right?) for the background but there are many pretty papers that would be appropriate, use a solid light blue or do a watercolor wash.
- This branch gets glued directly to the background square. Placement is 1" in from the right bottom corner. Match the angle of the bottom to the edge of the paper.

- This background fits right into frame # 4.
- Glue it in place inside the frame. Remember to keep the cut #4 in the upper left corner.

7. Assemble the first little bird.
- The little bird faces to the right and will get glued perched on the background branch.
- It is made up of these parts:

- I rubbed some ink from a marker onto my finger and then onto the white belly of the chickadee.
- I wanted a soft orange tint so just used a slight bit of ink. Pastels would work as well, or stamping ink. I added a little yellow to it also, keeping the color subtle. (This step is optional.)

- Glue the black bird shape on next. Tops line up.

- Then the gray shape.

- And the white markings.

- One foot gets glued to the front....

- And the other to the back.

- If any white shows around the head or back just use a black Sharpie Marker to color it in.
- The little bird gets glued to the background on the left branch just to the left of the 2 berries.

8. Assemble Bird 2 (larger bird)
- Bird 2 faces left.
- Here are the parts for bird 2.

- Color the belly slightly using the same technique.
- Glue the black back on.

- Add the gray layer.

- Add the white layer.

- Add one foot to the front and one to the back.

- Make sure the corner with the cut number ( now hidden inside the frame) is always in the upper left.
- Frame 2 goes over frame 3 from the front. Frame 2 is slightly larger and should cover it.
- You are to glue these two frames together but their back edges should line up.

- From the back side, the back edge of frame 2 should be in line with the back edge of frame 3. This will space the two layers apart and create depth.
- Use glue dots to hold them in this position.

- The combined group of frame 2 and 3 will slide into frame 4. Frame 4 was folded in the opposite direction and its sides come forward. Frames 2 and 3 slide all the way down inside frame 4. Frame 4 is taller than 2 and 3 so it forms a spacer ridge.
- Use Glue Dots to hold these in place.

- Frame 1 gets placed over the grouping of frames 2, 3, & 4.
- Use Glue Dots to hold this last frame in place.

- Use glue dots to position the second bird in place. I placed it on the front with its tail extending out of the frame a little bit.

10. Stand back and take a look. Job well done!
.jpg)
If you liked this project take a look at my Butterfly and Poppy Shadow Boxes as well.
.jpg)

**********
© 2014 Marji Roy, Ashbee Design
Sharing this post at some of these link parties. They are worth checking out for other ideas.
Motivate Me Monday, Mop It Up Monday, Alderberry Hill, Metamorphis Monday, Tuesday Treasures,Today's Creative Blog, A Bowl Full of Lemons, Not Just a House Wife, The Inspiration Board, Romancing on a Dime, DIY Dreamer, Whatever Goes Wednesday, Transformation Thursday, House of Hepworths, Craftberry Bush, Jennifer Rizzo, One Artsy Mama, Craftionary, Flaunt in Friday, Tater Tots and Jello, Show and Tell Saturday, DIY Showoff, I Gotta Try That, Kathe With an E, The Girl Creative, Weekend Re-Treat
Your shadow box is adorable!
ReplyDeleteThanks Artsy. I am very pleased with this one.
DeleteWow this is so lovely, and what clear step by step instructions. thanks
ReplyDeleteYeah, I think it is obvious that I am a little detailed oriented......can be a problem but not when doing tutorials! Thanks for visiting.
DeleteOh m goodness, I love it! I'd love it if you came and linked up to the Do Tell Tuesday party..I adore paper crafts, and this is a work of art! mabeyshemadeit dot com
ReplyDeleteI love this! So beautiful. Thanks for sharing.
ReplyDeleteI got them all, they are so beautiful, thank you so much for the instructions. They are so easy to follow. Good night I need do to some cutting with my Silohuette :)
ReplyDeleteI have learned more each time I make a new shadow box. This one is the best construction and tutorial because I have applied all that I have learned to this. Thanks for taking the time to comment and have fun crafting.
DeleteThank you so much for sharing your post at The Weekend re-Treat Link Party on The Best Blog Recipes this week! Wanted to stop by and pin to our Party Boards while I was here tonight :)
ReplyDeleteShauna @ The Best Blog Recipes
I love this and would like to make it for a friend. I have a Silhouette SD though, not a Cameo. I saw the note on the design that it would be 'much' smaller if not made with the 12" X 12" paper. Do you know what the finished dimensions would be? Thank you?
ReplyDeletedo you have this 3D Winterberry Shadow Box on 3dcuts.com?
ReplyDeletethanks a lot for the great tutorial. Not everything went oké while cutting so I had to made soms adjustments. But look, pretty good I think!
ReplyDeletehttp://snollebol.blogspot.be/2014/12/aan-de-knutsel.html
Nice job Fran! Thanks for sharing.
Delete