Project Description:
Here is a cutting pattern and tutorial for a 3D Sleigh that stand about 4.5" tall. It has been designed to be combined with the 3D Reindeer and 3D Presents files as well although works beautifully alone. These 3 files are proportioned to work together. All are both Cameo and Portrait friendly. This tutorial is for the sleigh pattern. It comes with the cutting file for 1 present as well.

Here are all three files displayed together.

And, you might want to try them in all white!


- Cutting file for the sleigh is here.
- The tutorial for the reindeer is here. Cutting file is here.
- The tutorial for the presents is here. Cutting file is here .
Sleigh Tutorial:
Tutorial assembled using Silhouette Software Release 2.7.18. This tutorial assumes you already know how to use the Silhouette and Silhouette software. It can be cut on both Cameo and Portrait Silhouette machines.
Supplies Needed:
- Template from Silhouette On-Line Store here.
- Glue dots 3/16"
- Spray Glue
- Silhouette Cameo or Portrait
- Card Stock in red and black
- Paper in a small Christmas pattern
- Post It Notes
Steps for completing the Sleigh project:
1. Download the cutting file for your Silhouette Cutting machine from the Silhouette Online Store here .
- The pieces needs to be copied and pasted into a new separate file depending on your paper size and the cutting machine you are using. All will fit onto 8.5 x 11" card stock.
- Copy the sleigh body and paste that into a new file.
- Copy the sleigh runners (1 shape) and paste that into a separate file.
- Copy the two pieces for the present and paste those into a new file.
- Copy the paper ribbon strips and paste those into a new file
- Cut your pieces from the card stock and paper you choose.

3. Assemble the sleigh runners.
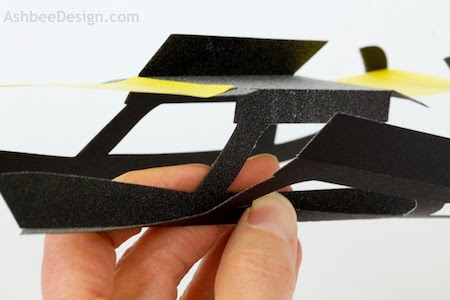
- Note each cut file has dotted cut lines. These are fold lines.
- Fold along all the lines of the runners. They are designed to double back on themselves to add strength to the sleigh. Fold all folds as shown in the image below

- Flatten the runner shape out again and place post-it notes over the side tabs of the connecting base noted in the image below.
- This is to protect this areas from spray glue. Cut the post-it note to completely cover the edge rectangle but leave the tabs exposed.

- I used spray glue to lay a layer of glue over the entire shape. You may chose other types of glue but I found this the quickest method. You will need to move rapidly once you spray the glue so be set to assemble the runners immediately.
- Be careful to not get over spray onto the reverse side.
- Quickly fold one runner up over itself.

- Switch to the other side and repeat with the other runner.
- Remove the post it notes and glue in both ends of the rectangular base. The tabs glue in under the sides to hold the runners square. I added a glue dot here because the spray glue was starting to dry.
- Do this on both ends of the base piece.

- Fold in the two top flaps to secure everything. They do not meet in the middle.

- Here is the completed base runners.

4. Assemble the sleigh body.
- Fold in on all dotted fold lines.

- Apply glue dots to the tabs on the sleigh front.

- Line the sleigh front with the side and glue into place.
- Do this on both front corners.


- Do the same with the back corners. Note that the back goes straight up between the sides. It does not match the curve of the sleigh back.

5. Combine the sleigh body with the runners.
- Use a generous number of glue dots and attach the sleigh base to the body.


The sleigh is now complete.

Fill it with presents.

And then hook up the reindeer!
**********
© 2013 Marji Roy, Ashbee Design
Sharing this post at some of these link parties. They are worth checking out for other ideas.
Motivate Me Monday, Mop It Up Monday, Metamorphis Monday, Tuesday Treasures, Today's Creative Blog, A Bowl Full of Lemons, Not Just a House Wife, The Inspiration Board, Romancing on a Dime, DIY Dreamer, Whatever Goes Wednesday, Transformation Thursday, House of Hepworths, Craftberry Bush, Jennifer Rizzo, One Artsy Mama, Craftionary, Flaunt in Friday, Tater Tots and Jello, Show and Tell Saturday, DIY Showoff, I Gotta Try That, Kathe With an E, The Girl Creative
Can't wait to make this, just bought these files this morning! I'm still in the Christmas mode, gearing up for next year
ReplyDeleteYou are more organized than I am. Thanks for finding me and have fun making the files. I am working on Valentine's themes now.
Delete