Project Description:
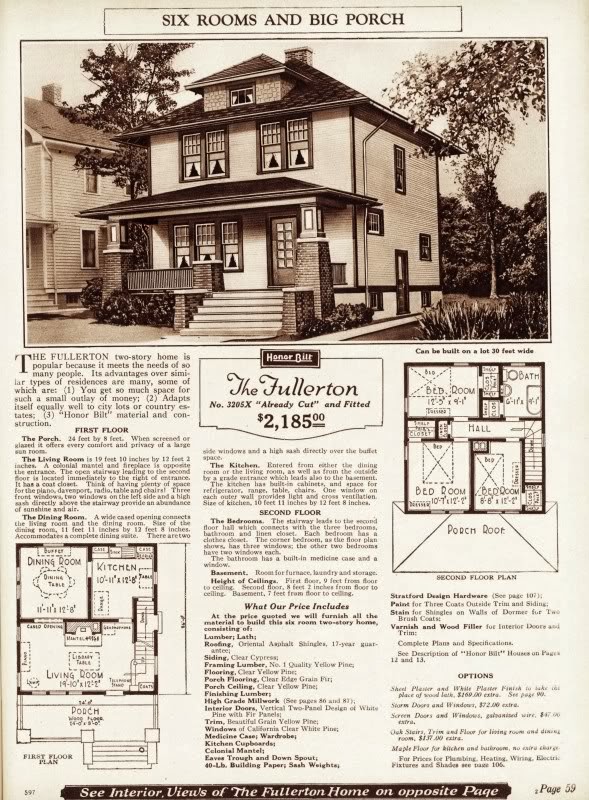
The Ledge Village is series of 3D buildings and accessories that can be combined in a mix and match fashion to build tiny villages on small ledges around your home. The buildings are thin, with all detail on the front so they fit on small trim ledges. This tutorial is for another house style, the Fullerton House.I thought the village needed a greater variety in house styles. I decided to incorporate an American Classic into the mix by choosing a Sears & Roebuck House. This design is based on a kit house sold through the Sears and Roebuck Catalogue back in the 1920's. The Fullerton was model No. 3205X and it sold for $1633 to $2,294!
Additional Note: For those of you that have been collecting the Ledge Village Series - There has been a pause in new designs, not because I have run out of ideas because I have been traveling. My husband and I just spent 7 weeks driving around the USA. That trip inspired many things, one of which was to use a Sears & Roebuck design in Ledge Village. I am blogging about the trip over here on my regular blog so come and visit for more info! And thanks to all of you for your continued support!

Here is the design I worked from.

(Note: I just finished the pattern for the winter tree. I am working on the photos and tutorial now. Should show up on Silhouette in next week's new designs.)
Other files in the Ledge Village series include:
- 3D Tower House • Tutorial
- 3D Haunted Mansion • Tutorial
- 3D Fire Station • Tutorial
- 3D Store 2 and Park Bench • Tutorial
- 3D Dormer House • Tutorial
- 3D Train Station • Tutorial
- 3D Backyard Necessities - Outhouse and Swing • Tutorial
- 3D Store and Gazebo File • Tutorial
- 3D Barn File • Tutorial
- 3D School House File • Tutorial
- 3D Church File • Tutorial
- 3D Cottage File • Tutorial
- 3D Two Story House File • Tutorial
- 3D Greek Revival House File • Tutorial
Fullerton House Tutorial
Tutorial assembled using Silhouette Software Release 2.7.18. This tutorial assumes you already know how to use the Silhouette and Silhouette software.
Supplies Needed:
- Template from Silhouette On-Line Store here.
- Glue dots 3/16"- a few removable ones as well
- Silhouette Cameo or Portrait
- Card Stock
Steps for completing the Fullerton House:
1. Download the cutting file for your Silhouette Cutting machine from the Silhouette Online Store here.
2. Prepare the files:
- The downloaded Silhouette file for the Fullerton House looks like this.

- It is laid out on a 12 x 18" mat and needs to be split into two separate files for cutting. Each file will fit on an 8 x 11" piece of card stock so it will work on both a Cameo and Portrait cutting machine.
- Copy the house front and paste it into a new file.

- Copy all the other pieces and paste those into a new file.

- The settings will depend on the paper you use. I have been using white index card stock and cutting at a speed of 3, a depth of 33 and the blade set to 3.
- Carefully remove the cut files from the backing mat.
- Here are the parts for this project. (Fences not included in photo.)

4. Fold the house front.
- Note each cut file has dotted lines. These are fold lines.
- Fold all the dotted lines inward except the front porch floor attached to the bottom of the house. That folds one fold outwards ( toward the front) and the other folds in the opposite direction (toward the back. This is highlighted in the first photo below.

- All other folds on the house should be made before gluing and these all fold toward the back.

5. Glue the porch floor in place first.


- I like to use Glue Dots on the edges although other glue types are appropriate.
- It is important to make square corners.
- You start this house by positioning the porch floor. Fold it into place.
- There are end flaps on each end of the porch floor. Place a glue dot on each end and glue these in place.
- There is also a side wall tab on one end that can be folded in and glued.
- Notice on one side there is a tiny notch cut out of the back. This is a guide notch to help you in lining up the back before gluing the side wall seam of the house. Locate the notch. The bottom of the side wall should line up with the notch. This will help keep things square.
6. Glue the house together- side, bottom then roof.
- Glue the side seam first using glue dots.
- Then the back tab of the porch floor gets glued up and onto the back of the house on the outside.
- Add glue dots to the tabs on the roof and glue those in place. The roof does slant back.
7. Build the dormer and add to roof.
- These are the pieces you will need for the roof and dormer.
- The dormer has multiple tiny folds.
- The roof sides and dormer sides are all folded back. (Shown below in red.)
- The holding tabs are all folded forward. (Shown below in blue.)
- Repeat on the side not visible in the photo as well.
- The dormer will be placed into the hole on the roof from the back to the front.
- Fold the tabs on the roof piece back first and then position the dormer in the hole.

- Place glue dots on the dormer tabs to hold it to the back of the roof piece.
- Below is an inside view with the dormer in place.
- Next add the dormer roof. Fold the tabs back and glue on top of the dormer on the front.
- Glue the roof with dormer onto the house.
8. Add the porch
- The top tab and bottom tab on the porch get folded toward the back.
- Line up the bottom tab. It will get glued onto the bottom of the house and the edges line up.
- Fold the porch fence railing toward the back and then around the back and glue in place.
- Do this on both sides.
Note: The top tab is not glued to the house. It will be glued to the porch roof in the next step.
- Fold all tabs on the porch roof toward the back.

- Adding the porch roof is a great place to use removable glue dots. The positioning is tricky.
- It gets glued about 1/8" below the upper story window and it is centered.
- Once you have the upper tab of the roof in place, add glue dots to the tab on the porch top and to the side tabs on the porch roof and glue all those in place. The side tabs are folded in and get glued to the house. The upper porch tab gets glued to the under side of the porch roof.
Add a few side fences and your Fullerton Sears & Roebuck home is ready to be added to Ledge Village!
**********
© 2013 Marji Roy, Ashbee Design
Great looking house! I can't imagine in this day and age to buy a house at that price. Of course in todays market we'd be paying 200 grand or so. Thanks for this addition to the village.
ReplyDeleteI thought the history behind the design added to its appeal. I wonder if any of the Paper crafters out there live in a Fullerton House?
DeleteI got all the ledge kits, & on sale!!!! I cant wait til I get done creating Christmas stuff- so I can start on this. I know my family will think I am bonkers, but I am ordering the paper you recommende. So waht if I already have 3-4 packs of white paper. :)
ReplyDelete