Project Description:
The Ledge Village is series of 3D buildings and accessories that can be combined in a mix and match fashion to build tiny villages on small ledges around your home. The buildings are thin, with all detail on the front so they fit on small trim ledges. This tutorial is for another house style, the dormer house. It is a country farm house with a wing and second floor window dormer. I thought the village was needing a greater variety in housing styles.
Other files in the series include:
- 3D Train Station • Tutorial
- 3D Backyard Necessities - Outhouse and Swing • Tutorial
- 3D Store and Gazebo File • Tutorial
- 3D Barn File • Tutorial
- 3D School House File • Tutorial
- 3D Church File • Tutorial
- 3D Cottage File • Tutorial
- 3D Two Story House File • Tutorial
- 3D Greek Revival House File • Tutorial
Here is a view of my growing ledge village......
.jpg)
Dormer House Tutorial
Note:
I am a new Silhouette Contributing Artist. Both my Silhouette files and this website are the beginning. Send along any suggestions, problems, ideas or photos as we learn to create together. I'd love to hear from you! Marji Roy
eMail: ashbeedesignemail@gmail.com
Tutorial assembled using Silhouette Software Release 2.7.18. This tutorial assumes you already know how to use the Silhouette and Silhouette software.
Supplies Needed:
- Template from Silhouette On-Line Store here.
- Glue dots 3/16"
- Scotch Tape
- Silhouette Cameo or Portrait
- Card Stock
Steps for completing the Dormer House:
1. Download the cutting file for your Silhouette Cutting machine from the Silhouette Online Store here.
2. Prepare the files:
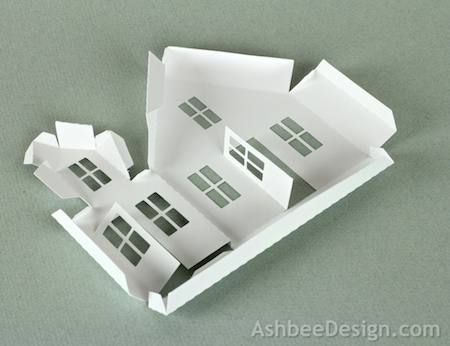
- The downloaded Silhouette file for the dormer house looks like this.

- It is laid out on a 12 x 18" mat and needs to be split into two separate files for cutting. Each file will fit on an 8.5 x 11" piece of card stock so it will work on both a Cameo and Portrait cutting machine.
- Copy the house front and paste it into a new file.

- Copy the house all the other pieces and paste into a new file.

- The settings will depend on the paper you use. I have been using white index card stock and cutting at a speed of 3, a depth of 33 and the blade set to 3.
- Carefully remove the cut files from the backing mat.
- Here are the parts for this project.

4. Fold the house front.
- Note each cut file has dotted lines. These are fold lines.
- Fold all the dotted lines inward except the house inset going back to the wing and the flaps on the dormer. Those fold in the opposite direction. Don't worry if you can't identify these places at the start. Just fold all the dotted lines and they will easily fold the other way when needed.
6. Glue the platform house front together.


8. Add the cover roof pieces.


- I like to use Glue Dots on the edges although other glue types are appropriate.
- It is important to make square corners.
- You start this house by positioning the wing area and gluing it to the floor.
- There are two small tabs on the floor piece that go behind the wing. Place glue dots on these and glue them into place working carefully to align the jog in the front wall with the floor.
- Add glue dots to the tiny tabs on the ends and glue the floor to the sides of the front.
- Next fit the peak of the roof (NOT the dormer) together and glue in place.
- Fold all three fold lines on the house back in the same inward direction.
- Fold on the flaps on the dormer in trying to make it flat and tiny, then feed it up through the slot on the roof area of the house back.
- Unfold the dormer flaps.
- Glue the end triangle of the roof in place using glue dots.
- Place glue dots along all tabs on the front that will hold the back in place.
- Work carefully here in placement - the back does line up with the edges of the front.
- It is important to keep things square.
- Add a piece of scotch tape up the valley between the two roofs. This will add strength to this area and gets covered.
- The dormer flaps now get attached to the front of the roof piece. Use either glue dots of scotch tape. These will be covered and not visible.
- Fold all the fold dotted lines on the roof pieces.
- Place the roof in position before putting any glue dots on it. You made need to trim the inside corner for a better fit depending on how your building went together. On some I had to trim and others I didn't.
- Once it fits, put glue dots on the back and glue into place.
- Put glue dots on the underside of the cover for the main peak and glue that into place.
- And do the same for the smaller peak over the dormer window.
And your dormer house is complete!

Place on the ledge with other buildings from Ledge Village.
- I use Blu Tak or a similar product to attach to the walls with a material that doesn't damage the wall and is easy to re-position.

.jpg)

**********
© 2013 Marji Roy, Ashbee Design
omg! seen this on Silhouette store and just WOW!
ReplyDeleteCan see this on display at Christmas with the touch of Glitter snow!
Amazing work!
Mel xxx
I have a different village for a winter snow scene. I'll released later in the fall. Still working on details.
DeleteDo you have a potential release date yet for this winter snow scene you mentioned? Also, a small suggestion; it would be nice to have you label the pieces for those of us who are cutting them out of different colors of card stock. For example, labeling the roof pieces "roof" would help group them together for a black sheet (or whatever color) so we don't have to read through the whole tutorial before are able to lay out the cutting files. Thks for your consideration. Love the village!
DeleteThis is totally cute. I'm totally thinking about incorporated these cuts in my nativity scene.
ReplyDeleteGood idea!
DeleteMarji,
ReplyDeletethank you again. My village here is growing and I love how you create different styles of houses.
You are welcome. I think the different styles add to the interest factor in the village. It needed them!
DeleteHi,
ReplyDeleteThe village is so nice, I have all the houses. But can you also give a tip on how to easily remove the tiny window leftovers from the cutting mat? I can't wait to print all, but I have to remove all the leftovers before I can proceed to the next house. Is there an easier way to do it?
Thanks.
Yes! Silhouette sells a scrapper tool for scrapping off the mat but I just use a common kitchen spatula. Turn it over and push it across the mat. All the little windows pop off quickly. Mine is for Teflon pans - not metal.
DeleteThanks so much for the tip. The spatula really works! You're right, the paper leftovers pop off quickly. Now I have finished the tealight village and am done with 6 ledge houses. I can't wait to set it up. Looking forward to more houses.
DeleteMarji,
ReplyDeleteI've just finished a little Christmas display with your Ledge village buildings. I adore the designs and as I was putting them together I was in awe of your design skills so Thank You.
http://www.getsilvered.com/?p=1013
Pam
Pam, Your applications are a beautiful variation. I love both. Thanks so much for sending along the links and blogging about it. I am going to share your work and site on my blog as well. Spread the Cheer!
DeleteReaders, follow Pam's link to her site and see how she used this file and others. Her display sense is wonderful!
Happy Holidays and Happy Crafting to you.
Marji
Ashbee Design
I know this is like last year but I'm new to the silhouette and I thought the houses were so cute, I just had to have them. I downloaded the whole village and I'm very excited about putting them together. The only think I did different is that I made my roof black so I could used them threw out the year.
ReplyDeleteAfter cutting the file out of patterned paper, I realized it would not work as it is. Wish I had thought about it before cutting lol. Some parts just need to be flipped over, and some need to be redone. Still love the house. As it is, without any changes, the file can be nested to fit into one 12x12 sheet of paper, which I liked very much!.
ReplyDeleteHallo habe soeben Ledge Village Dormer House aus dem Silhouette Designs Store heruntergeladen.Leider funktioniert die Datei nicht.Kommt die Meldung Dateiformat wird nicht unterstützt.Bitte um baldige aufklärung da es die einzige Datei ist die mir für die Village noch fehlt.
ReplyDeleteVielen Dank
I’ve had the ledge houses in my Silhouette Library for decades. I finally got around to making them. So far I have made the Schoolhouse and the twol story house. They are so easy to put together and they look great on my window ledge. Thank you so much for designing them.
ReplyDelete