Project Description:
The Ledge Village is series of 3D buildings and accessories that can be combined in a mix and match fashion to build tiny villages on small ledges around your home. The buildings are thin, with all detail on the front so they fit on small trim ledges. Each file comes with a building and some accessories to build the village. This tutorial is for the a second store front design and a park bench. I felt my village needed more variety in its "downtown" buildings.
Other files in the series include:
- 3D Dormer House • Tutorial
- 3D Train Station • Tutorial
- 3D Backyard Necessities - Outhouse and Swing • Tutorial
- 3D Store and Gazebo File • Tutorial
- 3D Barn File • Tutorial
- 3D School House File • Tutorial
- 3D Church File • Tutorial
- 3D Cottage File • Tutorial
- 3D Two Story House File • Tutorial
- 3D Greek Revival House File • Tutorial
Note:
I am a new Silhouette Contributing Artist. Both my Silhouette files and this website are the beginning. Send along any suggestions, problems, ideas or photos as we learn to create together. I'd love to hear from you! Marji Roy
eMail: ashbeedesignemail@gmail.com
Tutorial assembled using Silhouette Software Release 2.7.18. This tutorial assumes you already know how to use the Silhouette and Silhouette software.
Supplies Needed:
- Template from Silhouette On-Line Store here.
- Glue dots 3/16"
- Silhouette Cameo or Portrait
- Card Stock
Steps for completing the 3-D Store Front #2 Construction:
1. Download the cutting file for your Silhouette Cutting machine from the Silhouette Online Store here. The store front and park bench come in the same file. I will give the storefront assembly directions first, followed by the park bench below.2. Prepare the files:
- The downloaded Silhouette file for the store front 2 and park bench looks like this. The store front and park bench fit on an 8.5 x 11" piece of card stock.

3. Cut the files.

- The settings will depend on the paper you use. I have been using white index card stock and cutting at a speed of 3, a depth of 33 and the blade set to 4.
- Carefully remove the cut files from the backing mat.
- Here are the parts for the store and park bench. You might want to cut multiple park benches.
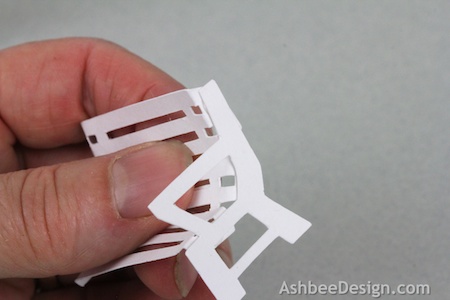
4. Fold the store and awning.
- Note each cut file has dotted lines. These are fold lines.
- Fold all the dotted lines inward and the doors out.

5. Glue all seams starting at the base.
- I start putting the building together at the base using glue dots.
- Work to keep the edges square.

- Glue up the flat roof.
- It is placed below the front edge.

- I insert a skinny tool through the door to help press all seams together.

- There is not separate roof piece (like in the other Ledge Village designs) for the store front.
- I glued the back and side last to complete the building frame

- Add the cornice piece to the front. It is just a flat piece that provides decoration.

6. Glue the awning together.
- Add a glue dot at each end to hold it in place.

- Put glue dots on the back side of the awning and position it on the store front above the doors.

Park Bench Construction
- Roll the the bench piece around round object to curl the paper.

- There are no dotted lines but you do have to make folds. (The pieces are too small for dotted fold lines so I left them off.)
- You must fold over the glue tabs on each side of the bench.

- Put glue dots on each of the tabs.

- Fit them to the end of the park bench.
Repeat for the other end and then make several to scatter around your village.
**********
© 2013 Marji Roy, Ashbee Design
Me too! Thanks for visiting and commenting.
ReplyDeleteMarji,
ReplyDeleteThese are so cool! You make me smile and now it is, that every week I'm going through all new files at Sil Shop to find if you have contributed something new. :D Love them all individually and together.
Thank you so so much for sharing your creativity with us.
There will be more buildings but I also have some other projects coming. If you want to see all of mt house click on Browse Artist in the Silhouette store and select Marji Roy.
DeleteMy little village is here: http://unique-by-annemaritta.blogspot.co.uk/2013/09/little-village.html
ReplyDeleteNo theme yet, but wanted to try them out. More to come :)
Is it possible there was a slight error on the store structure for this one?? This is the fifth one I've put together of your village (I splurged and got all of them and am working my way thru them!), and one of the sides seems slightly wider than the other. . . . . the others buildings have been a piece of cake to put together. . . . Any suggestions you have would be appreciated!!
ReplyDeleteI am having the same problem. Did you manage to solve it or did you have any answer from the maker? Also the small canopy above the door seems to have a flaw on the little sideflaps, where I can't fold them inwards because the tips are too long and push against the other side
Delete